Query the Data Warehouse
Extracting versioned data from the warehouse will require setting up a database tool, such as DBeaver. To configure a database tool for the Warehouse Database, a username and password will be needed. The user profile dropdown displays the Database Host and allows the user to reset the Warehouse Database password, if needed.
Table of contents
Install an Open Source Database Tool
The following instructions will walk through setting up a free/community version of DBeaver to query the Warehouse Database. DBeaver is a multi-platform database tool that supports many in demand databases such as PostgresSQL, Oracle, MySQL, Redshift, etc.
These instructions will also cover configuring the DBeaver/Warehouse Database connection and basic examples explaining how to extract information from the warehouse.
Install DBeaver
To begin, visit DBeaver and explore the download options to find the appropriate system version. Popular version configurations include MS Windows, MacOS X, and Linux.
- Select the
DBeaverdownload that aligns with the computer operating system. Once selected, that version should download to the computer. - Open the downloaded
DBeaverfile to begin the installation process. - A window will appear to begin this process and prompt the user to select which language is desired. Once selected, click OK.
- Click Next to continue the installation.
- Read the License Agreement and accept by clicking I Agree.
- A prompt will ask whether the
DBeaverapplication should be available to the active user only (the individual who downloaded the application to their device), or for any user who may use the machine. Select the appropriate response and click Next. - DBeaver will prompt the user to select which components to download. For Data Refinery, selecting DBeaver Community and deselecting any other components satisfies the requirements. Click Next to continue.
- Before completing the installation, a Start Menu Folder needs to be selected. Select an existing folder or create a new one. Click Install.
- Upon completing the download, the individual may be prompted to verify that the application (
DBeaver) is allowed to make changes to the device. Select the preferred response and continue. - Select Finish to complete the installation.
- A system response may indicate that
DBeaverhas finished installing.
Note. The following instructions are modeled after the Windows version of
DBeaver. Instructions may vary for MacOS X and Linux installations.
Configure the DBeaver/Warehouse Database Connection
Open the DBeaver application to configure the Warehouse Database connection.
- Once
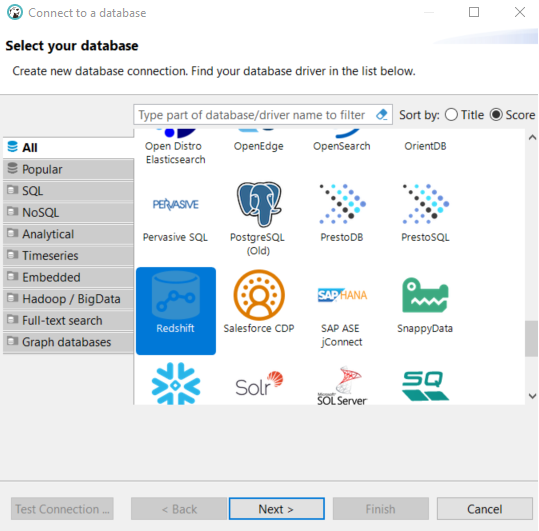
DBeaveris opened, select the New Database Connection button in the top left navigation. - Select the desired database. For this example, Redshift is selected.
- Click Next.
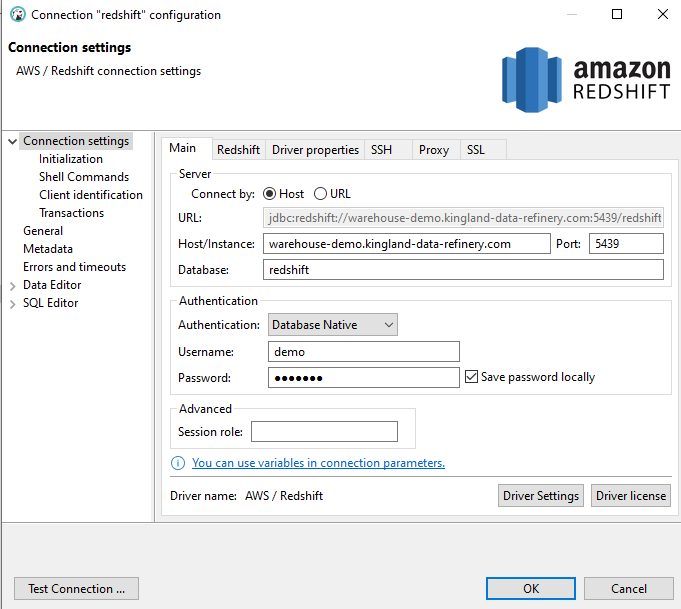
- A new window will appear. Ensure that the server is connected by Host.
- Enter the following fields:
- Host/Instance - The Database Host which can be found on the Source Details page or on User Profile in Data Refinery.
- Port - 5439
- Database - redshift
- Username - Data Refinery username
- Password - Warehouse password. The default warehouse password is the user’s password to log in to Data Refinery. The password can be changed using the Reset Redshift Password link on User Profile.
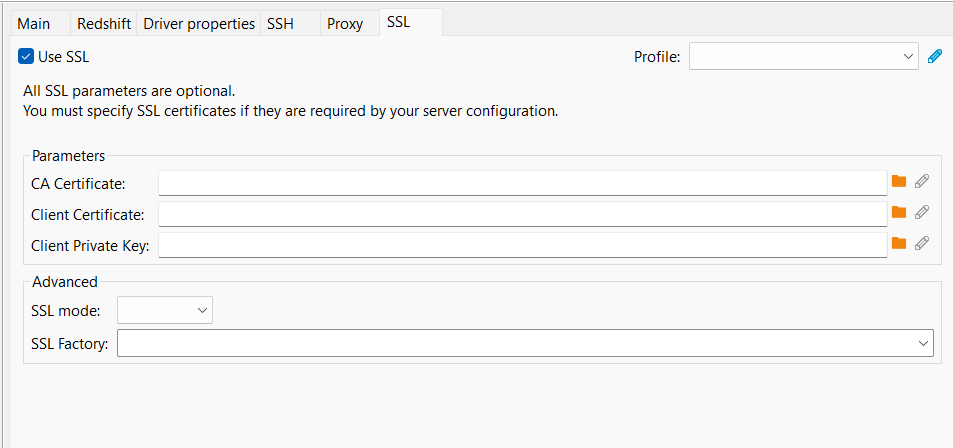
- Click the SSL tab and check the “Use SSL” box.
- Click Test Connection in the bottom left corner of the window.
- Optional - The connection can be named “General - Connection name” if needed. This name will be displayed in the Database Navigator.
- If the test is successful, congratulations, the Warehouse Database connection is now active! Select OK to finish.
Note. If “redshift” is not entered as the database when configuring the connection, the database connection will still be successful, but no data will show up in the database.
Project Schema and Source Table Name Format
In order to query the Warehouse Database, a user must understand the format of Project Schema and Source Table names.
The Project Details page in Data Refinery Designer will show the Project Schema Name. The schema name format is {ProjectName}_{ProjectID}. The Source details page within a Project in Data Refinery Designer will show the corresponding table name. The table name format is {SourceName}_{SourceID}.
Project Schema and Source table names should be lowercase, consisting of only alphanumeric characters and underscores. When Schema and Table names are created, spaces within a Project or Source name are replaced with an underscore. When querying a Source, ensure that Source names are lowercase to avoid any potential issues.
For more information on Project and Source details, see the Projects or Sources pages.
View a Table
To view the table contents:
- Locate and select the Database Navigator tab on the left side of the
DBeaverwindow. - From the Database Navigator tab, select the connection that was created earlier. This might prompt for entering the password if the password was not saved in the connection details.
- Once connected, select Databases, then select Redshift, then select Schemas.
- Select the schema corresponding to the Project.
- Finally, select Tables. The table will show all Sources connected to a Project.
-
To open a table and view the data, either double click the table or right click and select View Table.
The data from the table will populate in the lower panel of the
DBeaverscreen.
Create a Query
To view specific information:
- Right click the Warehouse Database configuration directory.
- Hover over SQL Editor, then click Open SQL Console.
- Paste the following query in the new tab (console). The following values will need to be changed:
- Replace “{ProjectSchemaName}” with the name of the Project schema.
- Replace “{SourceTableName}” with the name of the table intended to query.
select * from {ProjectSchemaName}.{SourceTableName} limit 10An example of this query with a Project Schema Name and Source Table Name can be viewed below.
select * from abc_bank_717.client_data_3338 limit 10 - To run the query, click the small, triangular play button to the left of the console.
- The query returns everything in the table, but limits the number of entries returned to ten.
Query a Specific Record
To view specific information:
- Right click the Warehouse Database configuration directory.
- Hover over SQL Editor, then click Open SQL Console.
- Paste the following query in the new tab (console). The following values will need to be changed:
- Replace “{ProjectSchemaName}” with the name of the Project schema.
- Replace “{SourceTableName}” with the name of the table intended to query.
- Replace “column_name” with the name of the table column intended to query.
- Replace “some_value” with the value to be found.
select * from {ProjectSchemaName}.{SourceTableName} where column_name = 'some_value'If the value desired is a number, quotes around the value will not be needed.
Example. The following query will return all rows where the first name is equal to Joe:
select * from abc_bank_717.client_data_3338 where first_name = 'Joe'
Join Two Sources With a Query
To join two Sources with a query:
- Right click the Warehouse Database configuration directory.
- Hover over SQL Editor, then click Open SQL Console.
- Paste the following query in the new tab (console). The following values will need to be changed:
- Replace “{ProjectSchemaName}” with the name of the Project schema.
- Replace “{SourceTableName1}” and “{SourceTableName2}” with the names of the tables to join in the query.
- Replace “column_name_in_source_1” with the name of a column in the first Source table.
- Replace “column_name_in_source_2” with the name of a column in the second Source table.
- Replace “some_value” with a value on which to filter the results.
 select * from {ProjectSchemaName}.{SourceTableName1}
       left join {ProjectSchemaName}.{SourceTableName2}
       on 'column_name_in_source_1' = 'column_name_in_source_2'
       where 'column_name_in_source_1' = 'some_value'
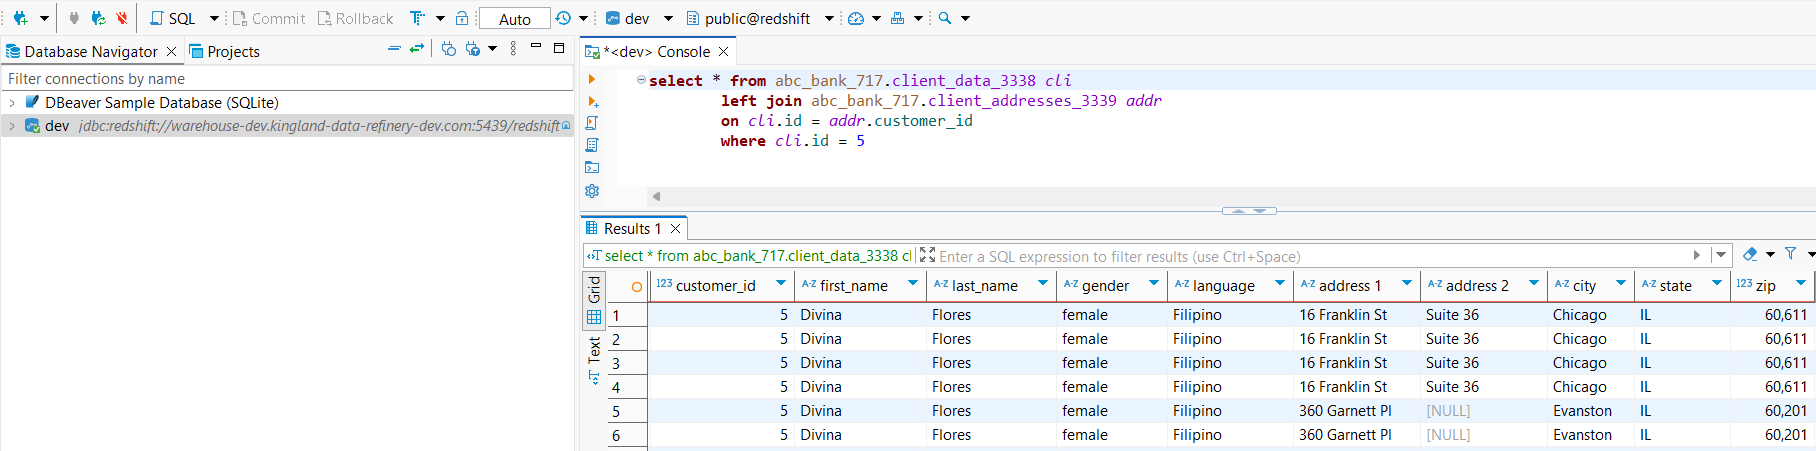
Example. Two hypothetical tables, a client data table and a client address table, will be used. When joining tables, the two fields must match. Normally, something like an id column in the client_data table will correspond with a customer_id column in the client_address table.
To match the correct customer with the correct address, join the tables using these ids. The table aliases cli and addr are used for brevity.
See the query example below:
select * from abc_bank_717.client_data_3338 cli
        left join abc_bank_717.client_addresses_3339 addr
        on cli.id = addr.customer_id
        where cli.id = 5
Queries like this can be used to determine if, for example, the customer with an id of 5 has multiple addresses.