Set-up and Query Source Versions
This document will detail how to create a Source and Source versions using the command line and in the User Interface (UI). This documentation will also cover how to extract the versioned data from the warehouse. Extracting this data will require setting up a database tool, such as DBeaver. See the Query the Data Warehouse page for help on how to do this.
If a Source is already present with multiple versions and assigned to a Project, skip to Create a Query to Return Both Versions step.
Table of contents
- Create a Source With an Automatically Managed Schema
- Create a Source With a Manually Managed Source Schema
- Add the Source to a Project
- Upload Table Data to the Source
- Create a New Version
- Upload Data to the New Version
- Create a Query to Return Both Versions
- Query the Source API Endpoint
- How to Delete Specific Source Data Files
Create a Source With an Automatically Managed Schema
To create a Source, run the following Command-Line Interface (CLI) command, with a few adjustments.
- Change the URL to match the user’s domain.
- Replace “your_token_here” with the user’s token.
-
Finally, replace “customer-table” with the correct Source name.
- The Source name will become the name of the table in the database.
- Dashes in the name will be replaced with underscores automatically, “customer-table” becomes “customer_table” in the database.
curl --location "https://example.kingland-data-refinery.com/api/sources" --header "Content-Type: text/plain" --header "Authorization: Bearer your_token_here" --data "{\"name\":\"customertable\"}"
The return value will be the Source object created and will look similar to the following:
{"ID":1,"createdAt":"2023-06-07T12:52:56.608815859Z","updatedAt":"2023-06-07T12:52:56.608815859Z","deletedAt":null,"name":"customertable","path":"customertable","description":null,"sourceType":null,"sourceTypeModel":{"ID":0,"createdAt":"0001-01-01T00:00:00Z","updatedAt":"0001-01-01T00:00:00Z","deletedAt":null,"value":""},"projects":null,"fields":null,"versions":[{"ID":1,"createdAt":"2023-06-07T12:52:56.618449642Z","updatedAt":"2023-06-07T12:52:56.618449642Z","deletedAt":null,"sourceID":1,"version":1,"changeType":""}]}
Note. Creating the Source automatically generates the first version for it, as can be seen in the JSON above.
Refer to the DR Designer API Sources Reference to learn more about creating a Source.
Create a Source With a Manually Managed Source Schema
To create a Manually Managed Source Schema (MMSS), run the following CLI command, with a few adjustments. A manual Source can be used to avoid using crawlers and reduce costs, but the schema will need to be defined. Although the cost reduction may not be much, users do not have to wait for crawlers to run. Users can also define schemas on complex data types that Glue can’t handle or classify incorrectly.
The following fields are all required:
- Change the URL to match the user’s domain.
- Replace “your_token_here” with the user’s token.
- Replace “customertable” with the name of the new Source.
- All table and column names adhere to a set of rules and must:
- Begin with an ASCII single-byte alphabetic character or underscore character, or a UTF-8 multibyte character that is two to four bytes long.
- Subsequent characters can be ASCII single-byte alphanumeric characters, underscores, dollar signs, or UTF-8 multibyte characters that are two to four bytes long.
- Length is between 1 and 127 bytes, not including quotation marks for delimited identifiers.
- Cannot contain any of the following characters: spaces, single quotation mark (‘), double quotation mark (“) or a backslash ().
- Cannot be a reserved SQL key word.
- All table and column names adhere to a set of rules and must:
- Replace “description” with a description of the Source.
- Replace “Blended” with the correct Source Type. Options are: External, Blended, and Mastered.
- Keep “manuallyManagedSchema” set to true.
- Classification needs to match the type of file that will be uploaded. Options are: CSV, JSON, JSONL, ORC, and Parquet.
- For Fields
- Replace the name values
id,first_name,last_name, etc. with the names of the columns of the table. These column names must match the field names in the file that is uploaded, unless the file is a CSV. The table will not display the data unless the columns and fields match.- In the case of a CSV, the fields/columns can be given any name but the data types must match. Also, the column header order matters. If a user defines
helloandworldas the columns, then uploads data asID,helloandworld, the data will be shifted by one column, and the data in theworldcolumn will not import. Additionally, before uploading a CSV, the header row must be removed from the file or it will be added as a row of data in the table.
- In the case of a CSV, the fields/columns can be given any name but the data types must match. Also, the column header order matters. If a user defines
-
Replace “string” or “bigint” with the data type of the column. For example, the
first_namecolumn can’t have a value of “bigint.” These data types must correlate or the table will not be queryable. Supported column data types include:Supported data type Example field value CSV JSON JSONL ORC Parquet bigint “bigint” Y Y Y Y Y boolean “boolean” Y Y Y Y Y date “date” Y N N Y Y timestamp “timestamp Y Y Y Y Y string “string” Y Y Y Y Y char “char(10)” Y Y Y Y Y varchar “varchar(10)” Y Y Y Y Y decimal “decimal(6,2)” Y Y Y Y Y double “double” Y Y Y Y Y float “float” Y Y Y Y Y int “int” Y Y Y Y Y smallint “smallint” Y Y Y Y Y array “array<char(10)>” N Y Y Y Y map “map<varchar(20), string>” N Y Y Y Y struct “struct<field_name:varchar(10), other_field_name:varchar(20)>” N Y Y Y Y - The description is an optional field used to further explain the column.
- The Source name will become the name of the table in the database with an underscore connecting the id of the Source.
- Refer to the POST (Create Source) API in the DR Designer API Sources Reference for further instructions on how to create a manual Source.
- Replace the name values
curl -X 'POST' \
  'https://example.kingland-data-refinery.com/api/sources' \
  -H 'accept: application/json' \
  -H 'Authorization: Bearer your_token_here'
  -H 'Content-Type: application/json' \
  -d '{
  "name": "customertable",
  "sourceType": "Blended",
  "classification": "CSV",
  "description": "description",
  "manuallyManagedSchema": true,
  "fields": [
        {
        "name":"id",
        "type": "bigint",
        "description":"description1"
        },
        {
        "name":"first_name",
        "type": "string",
        "description":"description2"
        },
        ...
   ],
}
'
The return value will be the manual Source object created and will look similar to the following:
Create Source API Sample Response
{
  "ID": 1,
  "createdAt": "2024-01-09T21:14:40.544711611Z",
  "updatedAt": "2024-01-09T21:14:40.825457469Z",
  "deletedAt": null,
  "name": "customertable",
  "path": "customertable",
  "description": "description",
  "sourceType": 2000,
  "manuallyManagedSchema": true,
  "glueTableName": "customertable_1",
  "classification": "CSV",
  "sourceTypeModel": {
    "ID": 2000,
    "createdAt": "2024-01-09T21:14:40.544304093Z",
    "updatedAt": "2024-01-09T21:14:40.544304093Z",
    "deletedAt": null,
    "value": "Blended"
  },
  "projects": [],
  "fields": [
    {
      "ID": 1,
      "createdAt": "2024-01-09T21:14:40.546038227Z",
      "updatedAt": "2024-01-09T21:14:40.546038227Z",
      "deletedAt": null,
      "sourceID": 1,
      "name": "id",
      "type": "bigint",
      "description": "description1"
    },
    {
      "ID": 2,
      "createdAt": "2024-01-09T21:14:40.546038227Z",
      "updatedAt": "2024-01-09T21:14:40.546038227Z",
      "deletedAt": null,
      "sourceID": 1,
      "name": "first_name",
      "type": "string",
      "description": "description2"
    },
    ...
  ],
  "versions": [
    {
      "ID": 1,
      "createdAt": "2024-01-09T21:14:40.546827742Z",
      "updatedAt": "2024-01-09T21:14:40.546827742Z",
      "deletedAt": null,
      "sourceID": 1,
      "version": 1,
      "changeType": ""
    }
  ]
}
Note. Creating the Source manually also creates the glue table and generates the first version for it. This means that once the file is uploaded to the Source, the data can be queried immediately (without the need to run a crawler). So, the “glueTableName” field is populated in the returned object. This is the table name a user will use when querying the manually managed source schema.
Refer to the DR Designer API Sources Reference to learn how to create a manually managed Source.
Add the Source to a Project
To add a Source to a Project, run the following CLI command, with a few adjustments.
- Change the URL to match the user’s domain.
- Replace “your_token_here” with the user’s token.
- Use the returned value of the last command the Source just created, and update the Project array with the Project id the Source should be assigned to.
curl -X 'PUT' \
  'https://dev.kingland-data-refinery-dev.com/api/sources' \
  -H 'accept: application/json' \
  -H 'Content-Type: application/json' \
  -H "Authorization: Bearer your_token_here"
  -d '{
  "ID": 1,
  "projects": [
    0
  ]
}'
The return value should be the Source with the assigned Project fully populated, like this:
{"ID":1,"createdAt":"2023-06-07T12:52:56.608815859Z","updatedAt":"2023-06-07T13:01:32.407804895Z","deletedAt":null,"name":"customertable","path":"customertable","description":null,"sourceType":null,"sourceTypeModel":{"ID":0,"createdAt":"0001-01-01T00:00:00Z","updatedAt":"0001-01-01T00:00:00Z","deletedAt":null,"value":""},"projects":[{"ID":1,"createdAt":"2023-06-07T13:01:32.397053447Z","updatedAt":"2023-06-07T13:01:32.397053447Z","deletedAt":null,"name":"","description":"","sources":null,"users":null}],"fields":[],"versions":[{"ID":1,"createdAt":"2023-06-07T12:52:56.618449642Z","updatedAt":"2023-06-07T12:52:56.618449642Z","deletedAt":null,"sourceID":1,"version":1,"changeType":"New"}]}
Refer to the DR Designer API Sources Reference to learn more about adding a Source to a Project.
Upload Table Data to the Source
To upload data to the Source, use the following CLI command, with a few adjustments.
- Change the URL to match the user’s domain and replace the “1” in the URL with the id of the Source where data will be uploaded.
- Replace “your_token_here” with the user’s token.
- Replace “path/to-doc/customers.csv” with the path of the document to be uploaded. Currently supported file types are CSV, JSON, JSONL, ORC, and Parquet.
- Before uploading a CSV, the header row must be removed or it will be added as a row of data in the table.
curl --location "https://example.kingland-data-refinery.com/api/sources/1/upload" --header "Authorization: Bearer your_token_here" --form "file=@\"/path/to-doc/customers.csv\""
The return value will be the file name as it is stored in the refinery. For the purposes of this example, ignore the file name.
{"filename":"file-5679706631242650752"}
Refer to the DR Designer API to learn more about uploading table data to the Source.
Create a New Version
To query and compare versions, a second version needs to be created for the same Source.
To create the new Source version, use the following CLI command with a few adjustments.
- Change the URL to match the user’s domain and replace the “1” in the URL with the id of the Source that is being created for a new version.
- Replace “your_token_here” with the user’s token.
- Replace the SourceID value, in the “–data flag,” with the desired Source id.
-
Replace “Creating second source” with the change expected in this new Source.
Before changing the version, ensure all Sources for the current version have been uploaded.
curl --location "https://example.kingland-data-refinery.com/api/v2/sources/1/versions" --header "Content-Type: text/plain"
--header "Authorization: Bearer your_token_here" --data "{\"sourceID\":1, \"versionComment\":\"New\"}"
The return value should be the new version created and should look similar to the following:
{"ID":2,"createdAt":"2023-06-07T14:10:59.703774105Z","updatedAt":"2023-06-07T14:10:59.703774105Z","deletedAt":null,"sourceID":1,"version":2,"versionComment":"New"}
Refer to the DR Designer API Sources Reference to learn more about creating a new version.
Upload Data to the New Version
To upload data to the new Source version, use the following CLI command, with a few adjustments.
- Change the URL to match the user’s domain and replace the “1” in the URL with the id of the Source where data is being uploaded.
- Replace “your_token_here” with the user’s token.
-
Replace “path/to-doc/customers.csv” with the path to the document to be uploaded. Currently supported file types are CSV, JSON, JSONL, ORC, and Parquet.
Caution. Files larger than 1GB will cause queries to fail. For the best query performance, upload files no larger than 100MB.
Now that a second version exists for the Source, the data will be automatically uploaded to that new version.
curl --location "https://example.kingland-data-refinery.com/api/sources/1/upload" --header "Authorization: Bearer your_token_here" --form "file=@\"/path/to-doc/customers-v2.csv\""
The return value will be the file name of the file stored in Simple Storage Solution (S3).
{"filename":"file-5679706631242650752"}
Refer to the DR Designer API Sources Reference to learn more about uploading data to the new version.
Create a Query to Return Both Versions
This section explains how to query both Source versions. This will require setting up a database tool, such as DBeaver. See the Query the Data Warehouse page for help on how to set this up.
Once a database tool is available, refresh the connection to the data warehouse and open a console window.
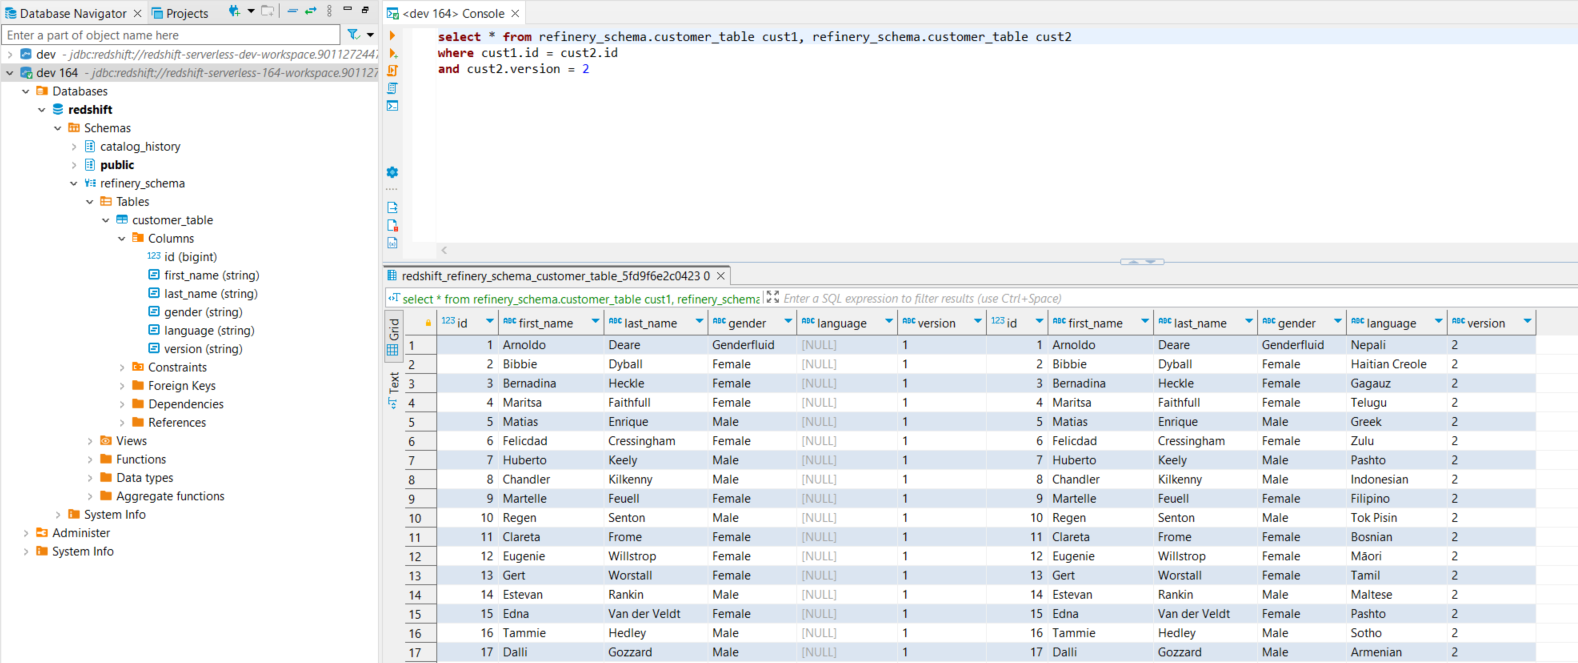
Queries involving multiple Source versions can be made with a self-join where a table is joined with itself. Paste the following query in the new tab (console) to extract the two versions for the Source. The following values will need to be changed:
- Replace “{ProjectSchemaName}” with the name of the Project schema.
- Replace “{SourceTableName}” with the name of the table intended to query.
- Replace “column_name” with the name of a column that exists in the queried version.
select * from {ProjectSchemaName}.{SourceTableName} 'alias_a', {ProjectSchemaName}.{SourceTableName} 'alias_b'
where 'alias_a'.'column_name' = 'alias_b'.'column_name'
and 'alias_b'.version = 2
Note. For more information on Schema and Table name formats, visit the Project Schema and Source Table Name Format section.
Our first csv/version only had four columns: id, first_name, last_name, and gender. The second version uploaded had five columns: id, first_name, last_name, gender, and language. The query below allows a user to retrieve both versions of the data. From here, customized queries can be created to extract data in various forms. This query will return all fields for both customer versions.
select * from abc_bank_717.client_info_3447 cli1, abc_bank_717.client_data_3447 cli2
  where cli1.id = cli2.id
  and cli2.version = 2
Query the Source API Endpoint
This section explains how to query both Source versions through the Query API. Querying through the API can be limited as it does not support complex queries such as JOINs. However, the API can expedite simple queries to view Source data since setting up a database tool is not required. To query a Source through the API, a user will need to create a Source query object.
How to Create a Source Query Object
The following items make up a Source query object.
-
The first two fields are the
sourceIDandsourceName. To query a Source, use one or both of these fields to identify the Source being queried. If both fields are used, their respective fields must match the same Source exactly.The user must also have the PROJECT_ADMIN permission or a User Project Role (UPR) to access the Source. Only populating these fields will result in a simple “SELECT all” statement on the Source.
-
The
columnsfield determines which columns are returned. If this field is left empty, all columns will be returned by the query. A user can be precise in determining which fields are returned by using this array to populate the desired column fields. -
queryObjectslists the values for WHERE statements. If multiple WHERE statements are provided, the AND operator will be used to combine them.The
whereColumn,operator, andwhereValuefields are necessary to complete the WHERE statement. ThewhereColumnis the name of the column, and thewhereValueis the value in thewhereColumnthe user is looking for. Theoperatoroptions are: equals (also coded as =, or equals), greater than (coded as >, or gt), less than (coded as <, or lt), like or ilike. -
sortOptionsdirects the column to sort by user preference. Options for sort direction are: descending (also coded as DESC), and ascending (also coded as ASC).
Refer to the example below on how to query the Source API Endpoint.
curl -X 'POST' \
  'https://example.kingland-data-refinery-dev.com/api/sources/query' \
  -H 'accept: application/json' \
  -H 'Content-Type: application/json' \
  -d '{
    "sourceID" : 1,
    "sourceName": "exampleSourceName",
    "columns": [
        "id",
        "first_name"
    ],
    "queryObjects": [
        {
            "whereColumn": "city",
            "operator": "ilike",
            "whereValue": "example city"
        },
        {
            "whereColumn": "first_name",
            "operator": "=",
            "whereValue": "customer name"
        }
    ],
    "sortOptions": [
        {
            "columnName": "first_name",
            "sortDirection": "Descending"
        }
    ]
}'
Refer to the DR Designer API Sources Reference to learn more about querying a Source.
How to Delete Specific Source Data Files
A user must have the PROJECT_ADMIN permission or the Project Owner Role in order to delete specific Source data files. For more information on obtaining the proper permissions, see the Permissions and Roles page.
To delete an uploaded Source data file, the data file path is needed. This path can be retrieved from the Data Warehouse using an Open Source Tool like DBeaver. For more information on DBeaver, see the Query the Data Warehouse page. The following procedures will explain how to obtain the data file path in order to proceed with Source data file deletion via the API.
Obtaining the Uploaded Data File Path
When calling the Delete API the uploaded file location will be needed.
- Open an Open Source Tool like DBeaver.
-
Establish a new database connection via Redshift.
For instructions on how to do this, see the Configure the DBeaver/Warehouse Database Connection section on the Query the Data Warehouse page.
-
To find a specific data file, use the
"$path"parameter.For example:
select *, "$path" from {ProjectSchemaName}.{SourceTableName} where {refinement conditions}Replace “{ProjectSchemaName}” with the name of the Project schema. Replace “{SourceTableName}” with the name of the table intended to query.
‘refinement conditions’ refines the query to find the desired path where the user may have different data to delete for different reasons. The refinement pinpoints the exact data/file to delete.
For example, if there is duplicate version data, the refinement may be
where version = 1 and id = 1. For uploaded bad data the query may be by id,where id = 1. Finally, if only one file was uploaded that needs to be removed, the query may not need a where clause:select "$path" from {ProjectSchemaName}.{SourceTableName}. - After refining the search, copy the desired uploaded data file path under the
$pathcolumn that renders after running a query.
Delete a Specific Source Data File
Once the uploaded file location has been copied, a user can use this to delete the file via the Delete API.
To delete a specific Source data file, place the Source ID and the uploaded data file path into the curl command below.
curl -X 'DELETE' \
  'https://{host}/api/sources/{SourceID}/upload?path={uploaded-data-file-path}'\
  -H 'accept: application/json'
Note. The uploaded-data-file-path is the S3 path to the uploaded data file. Must be URL encoded.
Refer to the DR Designer API Sources Reference to learn more about deleting specific Source files.